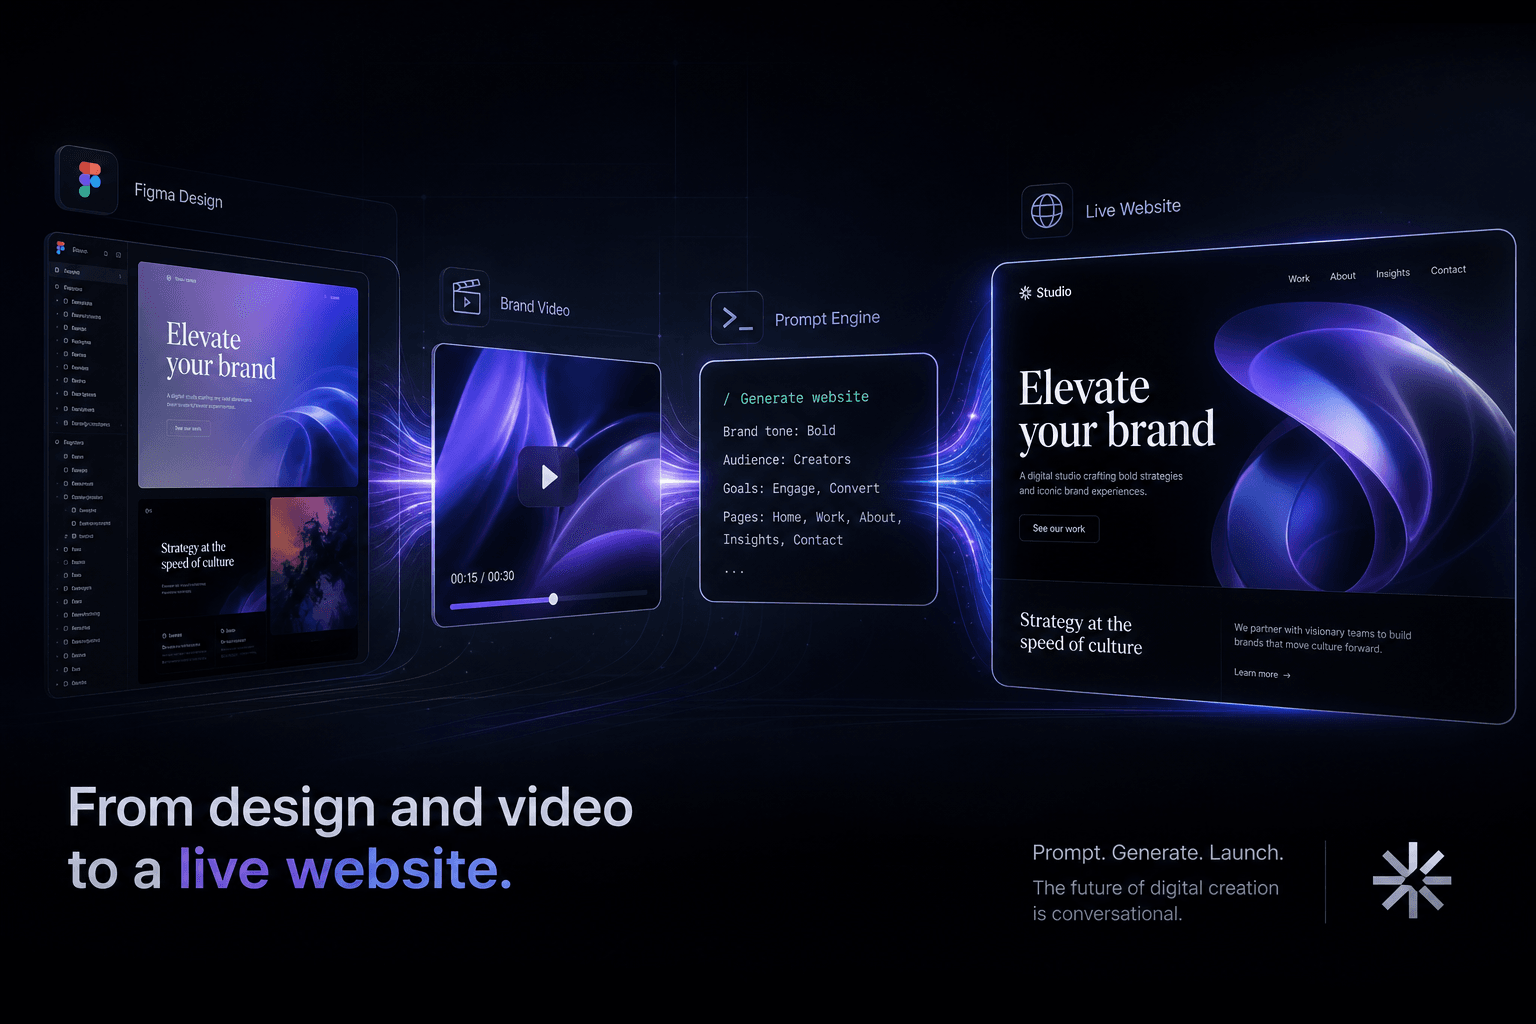
From a Figma Export and a Brand Video to a Live Site Using Only Prompts

Table of Contents
From a Figma Export and a Brand Video to a Live Site Using Only Prompts #
You do not write websites anymore. You direct agents to write them by feeding them context that captures the brand: Figma exports, brand videos, reference screenshots, and motion references. This is how I ship conversion-focused websites in hours instead of days — by assembling context manifests and running prompt sequences that hand off from design extraction to motion implementation to deployment. The Figma export establishes the type and layout system. The brand video informs the motion grammar. The result is a live site that feels on-brand because every decision was informed by real source media, not imagination.
This post walks through the exact prompt sequence I use to turn a Figma export and a brand video into a live, animated, conversion-optimized website. No code blocks. No manual typing. Just context assembly and agent direction.
The New Design Handoff: Context Manifests Replace Static Specs #
Static design specs are dead. PDFs, lengthy Figma comments, and written style guides all fail the same way: they describe the design instead of being the design. When you hand an agent a 12-page PDF and expect it to build a faithful site, you get generic output that drifts from your intent.
Context manifests fix this. A context manifest is a directory (or structured prompt attachment) that contains the actual source media: PNGs of every frame, SVGs of vector assets, JSON dumps of Figma styles, reference screenshots of sites you want to match, and video files that show kinetic behavior. The agent consumes these files directly, not a description of them.
| Handoff Method | Revision Cycles | Brand Fidelity | Time to First Draft |
|---|---|---|---|
| Written brief only | 8–12 | Low (40–60% match) | 6–8 hours |
| Figma link + comments | 5–8 | Medium (60–75% match) | 4–6 hours |
| Context manifest with media | 2–4 | High (85–95% match) | 1–2 hours |
The compression in revision cycles comes from one fact: when the agent can see the Figma frame and watch the brand video, it makes fewer assumptions. It extracts the actual hex codes, the actual easing curves, the actual timing relationships instead of guessing from a description.
For a recent artist website project, I handed Cursor a context manifest with 47 Figma frame exports, a 90-second brand sizzle reel, and three reference site screenshots. The first draft matched the Figma layout at roughly 90% fidelity. Two prompt refinements got us to 95%. Total time from context upload to deployable build: under three hours. That same project with a traditional handoff — written spec, manual component build, back-and-forth corrections — would have taken two days minimum.
What Goes Into a Complete Context Manifest #
A production-ready context manifest has five layers: visual system, motion grammar, brand voice, technical constraints, and reference benchmarks. Each layer gives the agent a different dimension of fidelity to match.
Layer 1: Visual System (from Figma)
- PNG exports of every frame at 2x resolution
- SVG exports of vector logos, icons, and decorative elements
- Figma JSON export of the styles panel (colors, typography, effects)
- Screenshots of the component panel showing variants and states
- Spacing annotations (I add a screenshot with redlines showing grid/gutter logic)
Layer 2: Motion Grammar (from brand video)
- The brand video file itself (MP4 or MOV, 30–120 seconds)
- Timestamped notes (I provide a text file with "0:12–0:18: card entrance with spring easing")
- Reference videos from other sites showing motion patterns to match
- Any existing brand motion guidelines (PDF or video)
Layer 3: Brand Voice
- Brand guidelines PDF (even 2–3 pages helps)
- Copy document with headlines, CTA text, and tone notes
- Any voice recordings or brand videos with spoken content
Layer 4: Technical Constraints
- Target platform (Next.js 16 + React 19, Astro, etc.)
- Animation library preference (GSAP for timeline control, Framer Motion for React native)
- Performance budget ("keep first load under 1.5MB", "60fps on mid-tier mobile")
- Accessibility requirements (reduced motion support, WCAG level)
Layer 5: Reference Benchmarks
- Screenshots of 2–3 sites showing interaction patterns to match
- URLs of award-winning sites with similar motion language
- Competitive sites to differentiate against
Here is the directory structure I use for every project:
context-manifest/
├── 01-figma-frames/
│   ├── hero-desktop.png
│   ├── hero-mobile.png
│   ├── about-section.png
│   └── ... (all frames)
├── 02-vector-assets/
│   ├── logo-main.svg
│   ├── logo-white.svg
│   └── decorative-shapes/
├── 03-style-extract/
│   ├── figma-styles.json
│   └── typography-scale.png
├── 04-brand-video/
│   ├── brand-sizzle-reel.mp4
│   └── motion-notes.txt
├── 05-brand-docs/
│   └── brand-guidelines.pdf
├── 06-reference-sites/
│   ├── site-A-interaction.png
│   └── site-B-scroll-pattern.png
└── 07-constraints/
    └── technical-spec.md
The key discipline: never describe what you can provide. Instead of typing "the hero has a bold sans-serif headline in dark blue," export the hero frame and attach it. The agent reads the actual pixels, not your interpretation of them.
Extracting Design Systems from Figma Exports #
The first prompt in the sequence extracts a structured design system from Figma exports — color tokens, typography scales, spacing primitives, and component hierarchies. I run this in Google AI Studio because Gemini 1.5 Pro's long context handles 20+ frame exports in a single prompt without losing coherence.
The prompt structure follows a pattern I call "show, then tell, then ask":
- Show the source files (attach the PNGs and JSON)
- Tell the agent what to extract (explicit list of design system primitives)
- Ask for structured output (specify the format: CSS variables, component tree, etc.)
Prompt template for design system extraction:
Attached are:
- [Attach: hero-desktop.png, hero-mobile.png, about-section.png, etc.]
- [Attach: figma-styles.json from the Figma styles panel export]

Extract a complete design system from these Figma exports. Read the actual
hex codes, font stacks, spacing values, and shadow/blur values from the pixels
and JSON. Do not approximate — extract exact values.

Output structure:

## Color Tokens
List as CSS custom properties (--color-*). Include primary, secondary,
semantic (success, error, warning), and neutral gray scale. Note any
gradients with exact stops.

## Typography Scale
List as CSS custom properties (--font-*, --text-*). Include:
- Font family stack for each weight
- Font sizes in rem
- Line heights as unitless ratios
- Letter spacing in em
- Weight mapping (400, 500, 600, 700)

## Spacing Primitives
List as CSS custom properties (--space-*). Use an 8px or 4px base unit.
Include all spacing used in frames (padding, gaps, margins).

## Shadow & Effect Tokens
List as CSS custom properties (--shadow-*). Extract exact blur, spread,
opacity, and color values from any card shadows, glows, or overlays.

## Component Hierarchy
Describe the component tree: which components contain which, what props
each needs (variants, sizes, states), and naming conventions.

## Responsive Breakpoints
Note where layouts change between desktop and mobile frames. List explicit
px values for breakpoints.
The quality of extraction depends on export resolution. I export Figma frames at 2x (PNG, not JPG) so the agent can read small type sizes and subtle color variations. For vector elements — logos, icons, decorative shapes — I export SVG and include them as separate attachments.
Common extraction errors and how to catch them:
| Error | Cause | Fix |
|---|---|---|
| Wrong hex code (off by 1–2 values) | JPG compression artifacts | Export PNG at 2x |
| Missing font weights | Agent only sees one weight used | Attach typography-scale.png showing all weights |
| Incorrect spacing | Agent misreads padding vs. margin | Add redline annotation screenshot |
| Lost gradients | Export flattening gradient layers | Include gradient frames as separate PNGs |
I always verify the extracted design system against the source frames with a second prompt: "Compare the extracted design system against the attached Figma frames. Flag any values that appear incorrect or inconsistent. Suggest corrections." This catches roughly 80% of extraction errors before they propagate into component builds.
Reading Motion Grammar from Brand Videos #
A brand video contains more motion information than a thousand written animation specs. The pacing of cuts, the easing of logo entrances, the physics of bounces and settles — all of this is encoded in the video itself. The trick is prompting an agent to watch the video and extract a structured motion specification instead of vague adjectives.
Motion grammar is the system of rules that govern how elements move in a brand's visual language. It includes:
- Timing curves: ease-out, ease-in-out, custom cubic-beziers
- Duration scales: micro-interactions (150ms), section transitions (400–600ms), page entrances (800–1200ms)
- Physics qualities: springy vs. damped, heavy vs. light, snappy vs. smooth
- Spatial patterns: direction of motion (up, down, left, right, scale), parallax depth layers
- Stagger relationships: how multiple elements choreograph their entrances
Prompt template for motion extraction from brand video:
Attached is a brand video (brand-sizzle-reel.mp4).

Watch this video and extract a detailed motion specification for web
implementation. Focus on timing, easing, and kinetic behavior that should
appear in website animations.

For each distinct motion pattern you see, provide:

1. Timestamp range (e.g., "0:12–0:18")
2. Element type (logo, card, text block, background layer)
3. Animation type (fade, slide, scale, parallax, rotation)
4. Direction (up, down, left, right, in, out)
5. Duration estimate in milliseconds
6. Easing curve description (ease-out, spring, custom bezier)
7. Any stagger or choreography notes ("text follows logo by 150ms")

Also note:
- The overall "feel" — heavy/industrial, light/playful, premium/luxury,
  energetic/dynamic
- Any scroll-like behavior in the video (parallax layers, pinned sections)
- Transition styles between scenes

Output as a structured motion spec document I can hand to a web animation
implementer. Include specific cubic-bezier values where you can estimate
them from the video timing.
Gemini 1.5 Pro (or the newly released Gemini 3.5 Flash) and Claude Opus 4.8 both handle video analysis well, but they extract different emphases. Gemini tends to capture timing relationships and choreography accurately. Claude tends to describe the emotional quality and "feel" of the motion more precisely. I often run both and merge their outputs.
From brand video motion to GSAP ScrollTrigger implementation:
Once I have the motion spec, the next prompt targets implementation. I do not hand-write GSAP timelines anymore — I prompt Cursor to generate them from the spec:
Attached:
- [Attach: motion-spec.md from previous extraction]
- [Attach: brand-sizzle-reel.mp4 for reference]

Implement a GSAP ScrollTrigger timeline for the hero section that matches
the motion spec exactly.

Requirements:
- Use the exact timing durations from the spec
- Match the easing curves using GSAP's CustomEase or standard eases
- Implement the stagger relationships as specified
- Include scrub behavior for scroll-linked animations
- Support reduced-motion media query
- Target 60fps on mid-tier mobile devices

Reference the attached brand video when making implementation decisions
about timing and feel.
The brand video serves as the single source of truth. When the agent questions whether an animation should feel "snappier" or "smoother," I point it back to the video: "Watch timestamp 0:34–0:42 again. Match that easing exactly."
Key insight: Motion fidelity matters for conversion. A site that matches the kinetic energy of the brand video feels cohesive. A site with generic fade-ins feels cheap. The brand video is your motion reference — use it.
The Prompt Sequence: From Context to Component Hierarchy #
The complete build sequence involves six prompt handoffs: design system extraction, motion grammar capture, component hierarchy generation, base component build, page assembly, and motion integration. Each handoff produces structured output that feeds the next prompt. No single prompt tries to do everything — that is the failure mode that produces generic, drifted output.
Handoff 1: Design System Extraction (AI Studio)
- Input: Figma frame exports + styles JSON
- Output: Structured design system (colors, typography, spacing, shadows)
- Agent: Gemini 1.5 Pro or Gemini 3.5 Flash in Google AI Studio
- Why: Long context handles many frames; excellent at reading visual systems
Handoff 2: Motion Grammar Capture (AI Studio or Claude)
- Input: Brand video + timestamp notes
- Output: Motion specification document with timing, easing, choreography
- Agent: Gemini 1.5 Pro, Gemini 3.5 Flash, or Claude Opus 4.8
- Why: Video analysis requires multimodal capability
Handoff 3: Component Hierarchy Generation (AI Studio)
- Input: Design system + Figma frames + technical constraints
- Output: Component tree document (which components contain which, props interface)
- Agent: Gemini 1.5 Pro or Gemini 3.5 Flash
- Why: Architecture decisions benefit from long-context reasoning over all frames
Handoff 4: Base Component Build (Cursor subagents)
- Input: Component hierarchy + design system + SVG assets
- Output: Component files aligned to the extracted system and hierarchy
- Agent: Cursor subagents, with each subagent scoped to one component family and its own model + workflow set in the prompt
- Why: Cursor is my daily driver for parallel build work because it is model-agnostic, cloud-capable, and better for splitting component families across focused agents without leaving the editor
Handoff 5: Page Assembly (Cursor, with Antigravity only when browser validation matters)
- Input: Base components + page layout specification
- Output: Page files with composed components
- Agent: Cursor by default; Antigravity when I want parallel browser agents to render a live dev server and compare against reference frames
- Why: Cursor handles most assembly work cleanly, while Antigravity earns its spot when visual browser validation is the bottleneck
Handoff 6: Motion Integration (Cursor)
- Input: Page files + motion specification + brand video
- Output: Pages with GSAP ScrollTrigger timelines, entrance animations, scroll effects
- Agent: Cursor Composer
- Why: In-editor refinement and preview; best for animation polish
Prompt dependency chain: The Figma exports feed Handoff 1, the brand video feeds Handoff 2, both outputs converge in Handoff 3, and that structure then flows into component build, page assembly, and motion integration in order.
The key discipline is never skip a handoff. If you try to jump from Figma exports directly to "build me a website," you get generic Bootstrap-looking output that ignores your source material. Each handoff adds structure: colors become variables, variables become components, components become pages, pages become animated experiences.
Output format consistency:
I standardize output formats between handoffs so agents can consume each other's output reliably:
| Handoff | Output Format | Consumed By |
|---|---|---|
| Design system | Markdown with named tokens, value tables, and component inventory | Component hierarchy, component build |
| Motion spec | Markdown with timing tables | Motion integration |
| Component hierarchy | Markdown with tree structure | Component build |
| Component build | Component files scoped by family | Page assembly, motion integration |
| Page assembly | Next.js page files | Motion integration, deployment |
Standard formats reduce friction. When the Handoff 4 subagents see a stable token name, a component inventory, and a breakpoint table in the design system output, they stop guessing and start matching.
AI Studio: Design System Extraction #
Google AI Studio is the optimal first agent because Gemini 1.5 Pro's or the newly released Gemini 3.5 Flash's massive context window swallows entire Figma export sets without truncation. I can attach 30+ frame exports, the styles JSON, and the brand video in a single prompt — something Claude's context window struggles with at this volume of visual data.
The setup:
- Navigate to Google AI Studio
- Create a new prompt
- Select Gemini 1.5 Pro (or the new Gemini 3.5 Flash which brings flagship-level visual reasoning)
- Attach all context files using the file upload button
The opening prompt for Handoff 1:
I am building a website based on the attached Figma design exports and brand
video. Your job is to extract a structured design system I can hand to a
development agent for implementation.

Attached files:
- Figma frame exports (PNG, 2x): hero-desktop.png, hero-mobile.png,
  about-section.png, features-section.png, cta-section.png, footer.png
- Figma styles JSON: figma-styles.json
- Vector assets: logo-main.svg, logo-white.svg
- Brand video: brand-sizzle-reel.mp4

Extract the following:

1. **Complete color system** as CSS custom properties. Read exact hex codes from
   the frames and JSON. Include semantic colors (primary, secondary, accent,
   success, error, warning) and full neutral gray scale (gray-50 through gray-950).

2. **Typography system** as CSS custom properties. Extract font families, weights,
   sizes (in rem), line heights (unitless), and letter spacing (in em). Define
   a type scale (text-xs through text-6xl or larger).

3. **Spacing system** as CSS custom properties. Use 4px or 8px base unit.
   Include all spacing values used consistently across frames.

4. **Shadow and effect tokens**. Extract exact shadow values (blur, spread,
   color, opacity) from card elements, buttons, and overlays.

5. **Layout patterns**. Note max-widths, grid columns, gutter sizes, and
   responsive breakpoints where behavior changes.

6. **Component inventory**. List all distinct UI components visible in the
   frames (Button, Card, Hero, FeatureRow, etc.) and their variants.

Output as clean markdown with named tokens, explicit values, and component
inventory tables. Be exact —
this spec will be used for pixel-perfect implementation.
Why this works:
- Visual fidelity: Gemini 1.5 Pro or Gemini 3.5 Flash reads color values accurately from PNG pixels
- Scale handling: 1M tokens means I never truncate; all frames inform the system
- Video context: It watches the brand video alongside the static frames, capturing kinetic relationships
Typical output from Handoff 1:
The best extraction output reads like a design-system brief, not raw front-end code. I want token names the next agent can reuse, explicit values, and a component inventory tied back to the frames.
| Token Category | Example Names | Example Value |
|---|---|---|
| Color tokens | Primary, Primary Light, Accent, Gray 900 | #0F172A, #1E293B, #3B82F6 |
| Typography tokens | Display XL, Heading LG, Body MD | 3.5rem / 1.05, 2rem / 1.15, 1rem / 1.6 |
| Spacing tokens | Space 4, Space 8, Space 16, Space 32 | 4px, 8px, 16px, 32px |
| Effect tokens | Card Shadow, Glow Overlay, Blur Soft | 0 12px 40px rgba(15,23,42,0.14) |
| Breakpoints | Mobile, Tablet, Desktop | 480px, 768px, 1280px |
The component inventory then lists what actually exists in the frames: primary and secondary buttons, split-layout hero variants, default and featured cards, alternating feature rows, CTA blocks, and footer patterns. That becomes the handoff document I save as design-system.md for Handoff 3 and Handoff 4.
Cursor Subagents for Component Builds, Antigravity for Browser Validation #
Cursor is my default parallel build surface because I can run subagents on any model, scope each one to a component family, and keep the whole workflow in the same environment. I only reach for Antigravity when the job specifically benefits from parallel browser agents that can render a live dev server and visually compare output against Figma frames or reference screenshots.
The practical split is simple. If I need three agents building nav, hero, and card systems from the same design-system.md, Cursor wins because I can set each subagent's model, workflow, and context boundaries directly in the prompt. If I already have a live dev server and I want agents that can open the page, inspect the rendered result, and visually diff it against the source frames, that is where Antigravity earns its spot.
| Build Surface | Best Use Case | Why I Reach For It |
|---|---|---|
| Cursor subagents | Parallel component families, repo-aware implementation, model-specific delegation | Model-agnostic, fast to fan out, works well for daily build work without leaving the editor |
| Antigravity | Parallel browser validation on a live dev server | Agents can render, inspect, and visually compare against reference frames before I approve the pass |
My default Handoff 4 prompt pattern in Cursor is one subagent per component family. I keep each agent narrow: one for navigation and menus, one for hero and above-the-fold sections, one for card and content modules, one for CTA and footer systems. Each subagent gets the same design-system manifest plus only the frame exports that matter to that family. That keeps fidelity high and drift low.
What I hand each Cursor subagent:
| Context Slice | Purpose |
|---|---|
design-system.md |
Locks in tokens, spacing, typography, and effects |
| Relevant frame exports only | Prevents the agent from generalizing from unrelated sections |
component-hierarchy.md |
Defines the exact component boundaries and variants |
| SVG assets for that family | Stops logo/icon approximations |
| Constraints notes | Keeps performance, accessibility, and platform expectations visible |
When I do need Antigravity, I use it after Cursor has already built the component families. That sequence matters. Cursor handles the heavy lifting of parallel implementation. Antigravity becomes the visual QA layer for browser-aware comparison, especially on motion-heavy, reference-sensitive work where a screenshot mismatch tells me more than a static diff.
Cursor: Polish, Motion, and Integration #
Cursor is where the site stops being a faithful mockup and starts feeling like the brand in motion. Once the component families and page assembly are in place, I use Cursor to tighten interactions, map the motion spec to the right sections, and clean up the places where a technically correct build still feels flat.
This phase is less about making new sections and more about refining hierarchy, pacing, and cohesion. The brand video becomes the reference for timing. The page itself becomes the reference for scroll rhythm. I am usually asking Cursor to improve what already exists, not invent a new system from scratch.
| Polish Pass | What I Ask The Agent To Check |
|---|---|
| Motion pass | Match entrance timing, easing feel, stagger relationships, and scroll pacing to the extracted motion spec |
| Integration pass | Make sure shared components behave consistently across sections and breakpoints |
| Conversion pass | Tighten headline rhythm, CTA prominence, visual emphasis, and scan paths |
| Restraint pass | Remove motion that looks clever but weakens clarity or load feel |
I keep this handoff grounded with explicit prompts such as: compare the live hero behavior against timestamps 0:12-0:18 in the brand video; audit whether the CTA stack enters too late relative to the headline; check whether the card stagger reads premium or generic. Those prompts work because the agent has both the motion spec and the rendered context.
The important point is that Cursor is not just "final polish." It owns assembly, refinement, and motion integration in the default workflow. Antigravity only joins when visual browser validation is the job. Cursor remains the main workhorse because it handles repo-aware edits, scoped subagents, and iterative passes without forcing me into a separate all-in-one bundle.
Scoping Context So the Agent Matches the Brand #
Brand fidelity comes from context discipline, not from giving the agent everything at once. The fastest way to get a generic site is to overload the prompt with every frame, every reference, and every random note you have. I scope context in layers so the agent only sees the assets required for the decision it needs to make right now.
I treat context like art direction. The global layer establishes what is always true: design tokens, motion principles, platform constraints, and reference benchmarks. The local layer establishes what is true for this exact task: one section, one component family, one viewport problem, one visual comparison. That split keeps the agent from mixing signals across unrelated parts of the site.
| Context Layer | Include | Leave Out |
|---|---|---|
| Global brand layer | design-system.md, motion spec, constraints, brand docs |
Unrelated section exports, unused reference sites |
| Component layer | Only the frame exports and assets for that component family | Entire page export sets if the task is one module |
| Section refinement layer | One screenshot of current output plus one screenshot of target state | Old iterations that muddy the target |
| Recovery layer | Last good output + exact drift examples | Broad "make it better" language |
The rule I follow is simple: point the agent at source material, then narrow the brief until there is only one reasonable interpretation left. If I am fixing the hero, the agent does not need the footer, the blog layout, or twelve inspiration sites. It needs the hero frames, the design-system tokens, the relevant motion timestamps, and a sentence telling it what success looks like.
This is also where Cursor beats single-threaded chat tools for day-to-day work. I can give one subagent the mobile hero exports, another the navigation states, and a third the testimonial cards, each with a different model and a different scope. That is how I keep the build parallel without turning the context into mush.
Common Failure Modes and Recovery Prompts #
Most bad agent output is not random. It usually comes from one of a few predictable failure modes, and each one has a recovery prompt that snaps the build back to the brand. I do not start over when drift happens. I diagnose which context layer failed, then I re-brief that exact layer.
| Failure Mode | What It Looks Like | Recovery Prompt |
|---|---|---|
| Design drift | Colors, spacing, and type start looking "close enough" instead of exact | "Reset to the attached design-system.md. Audit the last output against the source frames and list every token mismatch before changing anything." |
| Reference bleed | The build starts copying a reference site more than the actual brand | "Use the reference screenshots for interaction patterns only. Re-anchor visual decisions to the attached Figma exports and brand assets." |
| Motion fatigue | Every section uses the same fade-up and stagger pattern | "Re-watch the attached motion spec and brand video notes. Assign a distinct motion role to each section instead of repeating one entrance pattern everywhere." |
| Overbuilt sections | The agent adds decorative ideas that were never in the source material | "Reduce novelty. Remove any element that is not justified by the attached frames, assets, or motion references." |
| Context overload | The output gets inconsistent after a long session | "Start a fresh pass scoped only to this component family. Use the attached tokens, two target frames, and the current rendered screenshot. Ignore prior exploratory context." |
I also use comparison prompts aggressively. My favorite one is blunt because it works: "Compare the current output to the attached target frame like a creative director doing QA. List every mismatch in hierarchy, spacing, scale, color, contrast, and motion feel. Then fix only the confirmed mismatches." That forces the agent to audit before it edits.
When a recovery prompt fails twice, I change the surface instead of repeating myself. That might mean splitting the task into smaller Cursor subagents, or moving the visual comparison into Antigravity if the problem is clearly visible only in a live browser render. Repeating the same vague prompt is how people waste an afternoon.
Outcome: Hours to Live, Not Days #
The real win is not that an agent can produce files quickly. The win is that context-first handoffs remove the slowest part of web production: translation. Instead of manually converting design intent into implementation step by step, I give agents the original source material and direct the sequence so the build stays anchored to the brand from the first pass.
That changes the timeline in a very practical way. I spend more time assembling the right context and less time correcting invented decisions later. The first draft lands closer to the target, revisions are narrower, and the build reaches a client-reviewable state fast enough that momentum stays high.
| Workflow | Time Sink | Typical Result |
|---|---|---|
| Traditional design handoff | Manual translation from Figma notes into implementation decisions | Slower first draft, more revision cycles, more taste drift |
| Prompt + context workflow | Up-front context assembly and structured handoffs | Faster first draft, tighter brand match, fewer corrective passes |
On the kind of premium site work I do, that usually means hours to a live build instead of days lost in interpretation. It also means my role shifts toward creative direction, system definition, and QA, which is where the value is anyway. The typing is not the scarce skill anymore. The handoff is.
FAQ #
Can AI really build a complete website from just a Figma export? #
Yes, but only when the Figma export is part of a real context manifest. A raw link is not enough. I want frame exports, styles data, assets, and clear hierarchy notes so the agent has something concrete to follow.
How accurate is AI at matching Figma designs pixel-perfect? #
In my experience, the first pass lands around 90-95% when I use clean 2x PNG exports and tight context scoping. The last few points of fidelity come from directed QA passes in Cursor, not from hoping one giant prompt gets everything perfect.
What format should I export from Figma for best AI results? #
I export frames as 2x PNGs and include the Figma styles panel as structured data whenever possible. PNGs preserve the visual detail agents need for color, spacing, and typography extraction, while structured styles reduce token drift downstream.
How does a brand video inform website motion design? #
The brand video gives the agent motion grammar that static frames cannot carry on their own. Timing, easing, pacing, and section energy become much easier to match when the agent can reference the actual video instead of a vague animation brief.
Which AI tools work best for Figma-to-website workflows? #
I use Gemini 1.5 Pro or Gemini 3.5 Flash in AI Studio for extraction, Cursor subagents for the default parallel build, and Antigravity when I specifically want browser agents to validate a live render against reference frames. Cursor is the better daily driver because it is model-agnostic, subagent-friendly, and already where the repo work happens.
How do I keep AI builds on-brand without constant corrections? #
I scope context in layers so the agent only sees the brand tokens and source media relevant to the task in front of it. Too much context creates muddled output. Tight context creates cleaner decisions and fewer corrective passes.
What if the AI-generated site doesn't match my Figma design? #
Run a visual audit instead of issuing another generic rewrite prompt. Attach a screenshot of the current output beside the target frame, ask the agent to list every mismatch, and then have it fix only the confirmed deviations.
How long does a prompt-driven website build actually take? #
A complete immersive site build usually takes me between 4 and 12 hours depending on motion complexity and how clean the source material is. Most of that time goes into context assembly, art direction, and QA rather than manual implementation.
Related Reading #
- Next.js 16 + React 19 App Router Patterns
- The Immersive Web Design Manual
- AI Studio to Antigravity Revenue SOP
Ready to turn your brand vision into a high-converting immersive experience? I build custom 5-figure websites that ship in days, not months. Book a discovery call to discuss your project.
Related Posts

Bold Design vs Machine-Readable Structure: How Neo-Brutalism and Semantic Architecture Coexist
You don't choose between a bold Neo-Brutalist site and one AI can read. Here's how I ship both: expressive design on top of strict semantic architecture.

How I Built Fordo's Official Artist Website Without Writing a Line of Code
How I designed Fordo's artist site in Google AI Studio and built it by directing AI: a beautiful, alive experience wired for AI search, brand, and direct fan revenue.

How I Prompt Google Stitch + AI Studio to Design an Immersive Site From a Single Brand PDF
Feed a single brand PDF to Google Stitch and AI Studio, then direct the entire design through prompts and reference media to ship an immersive, conversion-focused website without writing animation code.